Melissa McGinn and Laura Matter – Garden Hotline Educators
Peas are annual plants (grow, bloom, flower and set seed within one growing season) that grow like a vine and can be planted in the cooler part of spring. Peas can be planted from March through May in the northwest for a reliable crop. We sometimes stretch that window to include February if we have a warm winter and into June if the summer starts out cool. Peas can also be sown in September and October for fall crops or to overwinter. Snow peas are especially suited for this season of planting.
Peas have been in cultivation since Neolithic times when human cultures began transitioning from hunting and gathering to agriculture for their sustenance. The pea’s Latin name speaks to this – the species part of their name sativum, means cultivated. Join the current movement of folks embracing growing their own food again. Growing peas is easy and satisfying and you will reap the rewards of your efforts in about 60 days!
Getting Started
Choose Your Pot and Soil
- Use a small pot – about the size of a 6 – 8 ounce yogurt container (you can even use a yogurt container if you put holes in the bottom to let the water drain out.) Plastic works well to help keep the soil moist.
- A 4 inch round or square growers pot can be used – the same size as the flowers that you buy for your garden come out of.
- If you don’t have 4 inch pots, try starting the seeds in a cardboard egg carton or cardboard strawberry basket. You can also use a plastic strawberry container lined with wax paper.
- Wood or paper pulp products dry out quickly. Keep an eye on the soil moisture if you use this type of container.
- Use potting soil you purchased from the nursery or garden center to start the seeds.
- Or mix compost with existing soil in your garden bed to get a nice fluffy mix. You want the soil to drain well and not impeded the seeds from sprouting.
- You can find organically certified soil mixes and compost at local nurseries- look for the OMRI label on them.
- Or you can assemble the ingredients to make your own!
Choose Your Seeds
- Common garden peas that are grown in the northwest include shelling types which you don’t eat the shell of, sugar snap peas which you do eat the shell of and pick when the pea plumps up like a shelling pea and snow peas which you also eat the shell of but you eat when they are flat and firm.
- Pea varieties have been developed that do especially well in the northwest, though most peas will grow here just fine. Learn more about breeding projects like those created by Calvin Lamborn, a man known as the father of the modern snap pea.
- From Corvallis, Oregon. Dr. Alan Kaupler of Peace Seeds brought us two tasty AND beautiful peas – Sugar Magnolia, a beautiful purple podded sugar snap pea and Magnolia Blossom, a sugar snap pea with a bi-colored bloom that grows on a vine with lots of tendrils which can also be harvested and eaten.
- Choose the type of pea you enjoy the most because you will have plenty to enjoy!
How To Plant the Seeds
- Follow the seed packet instructions – they will tell you how deep to plant , how long till they will sprout (germinate), what kind of light and water they need and when you can harvest your crop.
- Take a pencil or pen and poke holes twice the size of a pea in the soil, spaced evenly from each other at the depth recommended on your seed packet . In general seeds can be planted at a depth of twice the width of a seed. Place the pea in the hole and cover it with soil.
- Depending on the size of your container you can plant 3 to 5 seeds per 4 inch pot.
- Be sure to label your containers so you remember what you planted.
- Placing chopsticks or forks in the containers can help keep the indoor pets like cats away from the plants. Or have a squirt bottle nearby!
Caring for Your New Starts
- Peas will germinate outside right now so you can put them outside or keep them indoors in a sunny windowsill where you can keep your eye on them.
- Make your own watering bottle – Use scissors or a nail to poke several holes in the screw on lid of a plastic water bottle. This makes a great watering “can” with a gentle shower so you are not disturbing the soil in the pot or crushing new baby plants.
- Keep the soil evenly moist – don’t let dry out or the seeds will not germinate well and the seedlings will not thrive. BUT! Don’t keep soaking wet either or the seed will rot.
- If you are setting them outside in a place where slugs can get to them set out a little slug trap to draw them away from your seedlings.
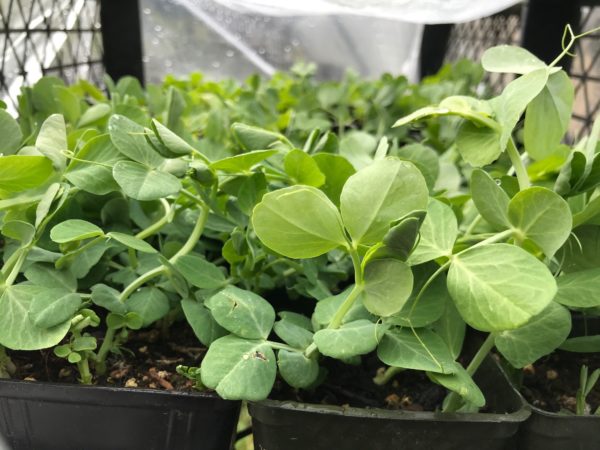
- Grow your peas in these pots until they are about three inches high or so – tall enough to avoid cutworm or slug certain depth when first planted out.
- Your starts could be ready in just about a week or two to be planted outside in their permanent bed. If you have been growing them indoors you will want to harden them off by putting them outside during the day and then bringing them back indoors at night for about five days.
- Be sure to not place them in the direct hot sun if you are just putting them out for the first time. The trick is to slowly acclimate them to the outdoor environment.
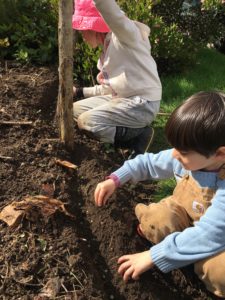
Settling The Peas Into Their “Forever” Home
When your peas have been sufficiently hardened off it will be time to plant them into their garden beds. Peas can go into large containers – at least 12 inch circumference and with some depth for root growth, into your raised beds or directly into beds in the ground.
- Staking the peas is important but not always necessary. Some peas are half sized vines and can support themselves by their tendrils twining around each other. Sometimes you can make use of a rock wall and put the pot on top of the wall edge and let the peas cascade over the wall.
- If you choose to stake them you will need to accommodate the way peas cling to a support. Build a trellis with vertical AND horizontal string or wood supports to allow for peas to cling with their tendrils. Unlike beans which use their entire stem to twine around a support, peas use their tendrils to grab onto a support and pull themselves up.
- Work a little organic, slow release fertilizer into the soil where you are going to start your peas, loosening the soil to a depth of about four inches. Avoid using chemical fertilizers that leach out into local waterways and cause pollution.
- Once supports are in place and your soil is prepared plant your peas within a few inches of the base of the support about 2 inches apart per plant.
- Take the little starts and empty the entire container into your hand. Gently tease apart the tops and roots from each other and lay them on a plate in a cool place while working with them. You can sprinkle them with water and lay a little soil over their roots to protect them.
- Gently firm the soil around the base of each seedling and direct the top toward the support.
- Water well with a fine spray – using a watering can or a gentle setting on a hose.
- Set out slug traps and step back and let them grow! In about 60 days you will have a delicious and succulent crop of peas to eat. If you make it back into the kitchen with any of them to cook try a recipe our garden writer friend Ann Lovejoy is fond of – Italian Risi Bisi. Or share one of your own with us!
- Check in with the Garden Hotline to go over this if you have any questions. We are available Monday through Saturday from 9 to 5!